DefaultPageTemplate.ascx

FOUR BEND BAY POLE
STEP 1.
Consider what you would like your bay pole to look like and choose the thickness of pole, the finish and the style of brackets and finials you like.
STEP 2.
Supply us with a photograph of the bay window area you need to dress.
STEP 3.
STEP 4.
Complete the x 2 forms at the bottom of the page giving the measurements (for 90 degrees angles a basic sketch with dimensions will suffice) and an indication which fittings and finish you require.
DECIDE YOUR POLE DIAMETER
We offer our bay window poles in two diameters:
Our best selling 20mm and a more substantial 25mm option.
SELECT A FINISH
FINISHES
You can choose from six finishes – Beeswax, Matt Black, Polished, Clay, Old Ivory and Mercury.
For more information on these finishes, please see our Product Finish pages
CHOOSE YOUR FINIALS
We offer a wide range of finial designs that perfectly complement your forged iron pole.
Choose from over 15 styles from traditional to modern, all beautifully handmade and available to see in our Curtain Pole Finials.
Remember - we only make bay poles in our 20mm and 25mm sizes so you will need to choose 20mm or 25mm finials.
SELECT YOUR BRACKET DESIGN
We offer two styles of brackets for the end of your pole, the classic Chapel and our versatile Sleeve. The sleeve bracket can also be used for a ceiling fixing. They all work with our clever Adjustable Passing Brackets that are fixed at intervals along your pole to enable the curtains to be drawn around the curve of your bay window. Our team will take into account how many passing brackets are required when making your pole.
DO YOU NEED EXTENDED BRACKETS?
We need to know if the brackets are going to be a standard projection or extended.
Our standard bracket projections are:
20mm pole – 40mm from wall to back of pole.
25mm pole – 47mm from wall to back of pole.We offer a range of extended brackets in our Chapel and Sleeve designs for our made-to-measure curtains poles that may also work for your bay pole.
The extended bracket projections are:
20mm Extended Chapel Bracket - 13.7cm from wall to front of pole.
25mm Extended Chapel Bracket - 16.3cm
from wall to front of pole.
20mm Extended Sleeve Bracket - 12.4cm
from wall to front of pole.
25mm Extended Sleeve Bracket - 14.9cm
from wall to front of pole.
POINTS TO CONSIDER WHEN MEASURING FOR EXTENDED BRACKET
WALL OR FRAME FIXED?
Please state if you intend to fix your brackets to the wall or to a frame as this will affect the overall projection of the brackets.
FULL LENGTH CURTAINS?
It is useful to know if you intend to hang full length curtains as we will need to make sure the bracket projections clear any protruding objects below them.
DIFFERENT BRACKET DEPTHS?
If your brackets are fitting on the window frame but then drop back to the wall at the sides, we need to know the depth of the frame.
CEILING MOUNTED?
If the pole is to be ceiling mounted, we still need to know the projection from the wall to the back of pole, as well of the projection from the ceiling to the top of the pole.You will need extended brackets to allow for protrusions like an architrave (2) deep window sill (3) or radiator (4).
All bracket measurements need to be from the fixing point (wall or frame) to the back of the pole.
When measuring, please remember to take into account the depth of any skirting board (5) radiator, (4) window sill (3) or architrave (2) that protrudes from your bay window and will affect the measurement required for your brackets.
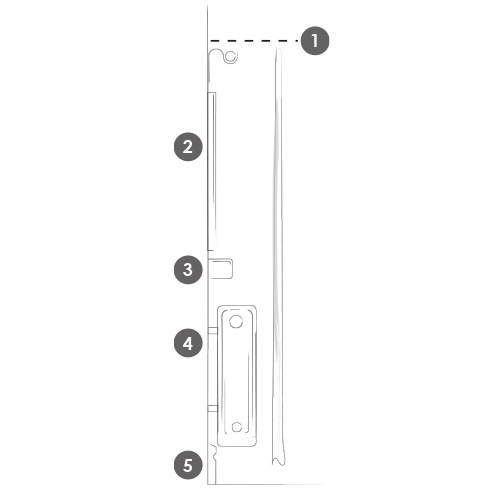
We require the measurement with the greatest depth (1) ie from the fixing point to the outer edge of whatever object sticks out the most.Please state the total length from the fixing point to the back of the pole.
DON'T FORGET CURTAIN RINGS
Our clever C-shaped Stoke Passing Rings allow your curtains to pass over the Adjustable Passing Brackets so you can fully draw your curtains.
They match our Stoke Rings which are used each end of your pole to anchor your curtain behind the end brackets.
You will need at least 2 Stoke Rings to hold your curtains at each end of your bay pole between the finial and bracket.
The C- shaped Adjustable Rings are used along the length of your bay pole so your curtains can draw past the passing brackets.
We generally recommend you use 1 ring per every 7cm of pole.
CHOOSE YOUR ACCESSORIES
If your bay window is particularly high, or you intend to fit heavy curtains, you may find it useful to use a draw rod to help pull your curtains to and fro. We also have a wide selection of curtain hold backs, ombres and hooks to accessories your bay window and a fabulous range of country inspired cottons, heritage wool, soft linens and luxurious silk fabrics that our talented soft furnishings team will turn into stunning curtains or blinds.
Made To Measure Curtains
Handmade Roman Blinds
DOWNLOAD, COMPLETE & SEND US THESE FORMS TO GET A QUOTE.
You can download the forms to complete digitally, or print them off. Simply fill in the required measurements ensuring you have provided us with your name and contact details and send it to us with your photo and paper template. If you do not have a printer or are unable to download the PDFs please contact us for assistance. If you have any questions, please get in touch, one of the customer service team will be happy to help.
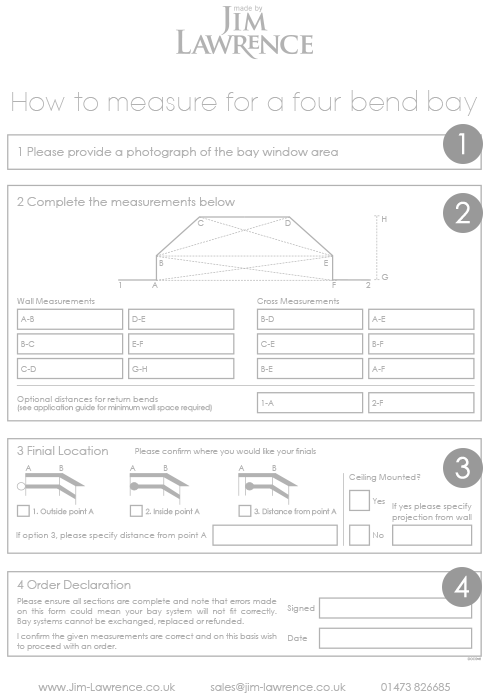
FORM 1. MEASUREMENTS
STEP 1
Provide a photograph.
Please provide us with a photo of your bay window area making sure there is no furniture in the way.
STEP 2
Complete the measurements required
All measurements need to be taken from the back wall. If you have a skirting board, please state the depth of it.
WALL
First measure the outside wall edge on the left of your bay window area (A) to the nearest corner (B).
Then measure the back wall from corners (B-C) and the back wall (C-D), corners (D-E) and lastly, fr om (E-F).
CROSS MEASUREMENTS
We also require diagonal measurements from corners (A-E) and (A-F).
From corners (B-D) and (B-E) and (B-F)
Finally, we need the width at the mouth of your bay window area (C-E).
If you have return bends, please give the distance from the outside corners of your bay area (A & F) to where you would like your finials to finish (1 & 2),so we need (1-A) and (2-F).
STEP 3
Finial Location
Please confirm where you would like your finials to finish.
Use the tick boxes provided to indicate where you would like your finials to finish - outside of your bay area (option 1) in line with your bay area (option 2) or inside your bay area (option 3).
If option 3, state how far in you want your finial (distance between the outside edge of your bay window wall and the outer edge of your finial.
If your pole is to be ceiling mounted, indicate the projection of the bracket you require, measuring from the back wall to the back of your pole, taking into account any protruding features like a proud window frame, architrave, deep window sill or radiator that will require your curtains to fall in front of (see Extended Brackets section above)
STEP 4
Order Declaration
Please double check your template and use the check list to ensure you have provided the correct information, then sign and date the form and send it back to us at the address below
FORM 2. ACCESSORIES
STEP 1
Choose the pole diameter you require.
STEP 2
Select your desired finish and whether you wish to include a draw rod.
STEP 3
Choose which finial style you would like.
STEP 4
Indicate whether your bay pole is ceiling mounted and if you need extended brackets to project over a skirting board, radiator, architrave etc (see our brackets information above).
BEFORE YOU SEND US YOUR DETAILS
1. Have you attached a photograph of your bay window area?
2. Have you made and included a paper template using something robust like wallpaper or brown paper?
3. Have you marked your template ‘This Way Up’?
4. Marked on the template where you would like the brackets and finials to be?
5. Indicated the depth of your skirting board, a deep window sill, radiator, architrave or any protruding objects that your curtain needs to fall in front of so we can make extended brackets with the correct projection?
1. Have you completed the appropriate form for the number of bends that you require for your bay window?
2. Stated, where asked, if your pole is to be wall or frame mounted?If it is to be wall or ceiling mounted?
3. Provided the depth of any extended brackets you require?
4. Have you completed the form that tells us which sized pole, finish and accessories you would like?
POST EVERYTHING TO US
When complete, send your photograph, paper template and forms, together with your name address and contact details to sales@jim-lawrence.co.uk or post to;
Jim Lawrence Traditional Ironworks Ltd
The Ironworks
Lady Lane
Hadleigh
Suffolk
IP7 6BQ
Please note, we cannot start making your bay pole until we have received a paper template.