DefaultPageTemplate.ascx

PENDANT LIGHTS FITTING GUIDE
Safety First
If in any doubt about electrical safety, contact a qualified electrician.
Installation should always be carried out by a qualified electrician or a competent person in accordance with current electrical regulation.
Please note that all our lights require earthing.
This light must be installed in accordance with the latest edition of British Standard 7671.
The electricity supply should always be isolated at its source (fuse box) before attempting any installation or maintenance.
Please do not fit bulbs exceeding the maximum allowable wattage as shown on the label adjacent to the bulb holder. Please note we do not recommend using halogen bulbs in our lights.
If the external flexible cable or cord is damaged, it should be replaced exclusively by Jim Lawrence or a similar qualified person in order to avoid a hazard.
If the glass components of this light are damaged during transit, please contact Jim Lawrence to discuss replacements.
Our outdoor light are rated IP44, suitable for bathroom zones 2 & 3 and exterior use. 220-240V 50Hz.

Wiring Diagrams
NB. If the wiring in your house predates the British standards regulation in 2004 to harmonise wiring colours. The colour of your wires may be different to the illustration.
Fitting Instructions
Position the ceiling rose where you would like it installed. Ensure you have a strong fixing point a ceiling joist or batten is ideal.
1. Mark and drill the holes for the fixing screws taking care not to damage any electrical cables. In many older houses this point can take some time to prepare.
2. Trim the cable of your pendant to suit your ceiling height and room proportions.
3. Before connecting the light to your supply wire, ensure the mains electricity is turned off.
4. We recommend you use the appropriate sealed connector block within your ceiling cavity to connect your light to the supply wire.
5. Ensure the cables are fully inserted into the connector block and connect the wires in accordance with the wiring diagram.
6. Screw the ceiling rose to the ceiling using the screws provided.
If you are unable to create enough cavity space for your wiring when using the ceiling rose supplied with your pendant, we can offer a retrofit ceiling rose with more capacity. Please see our website or brochure for details, or call us on 01473 826699.
1. Once you have an appropriate ceiling rose, simply secure it over the existing junction box.
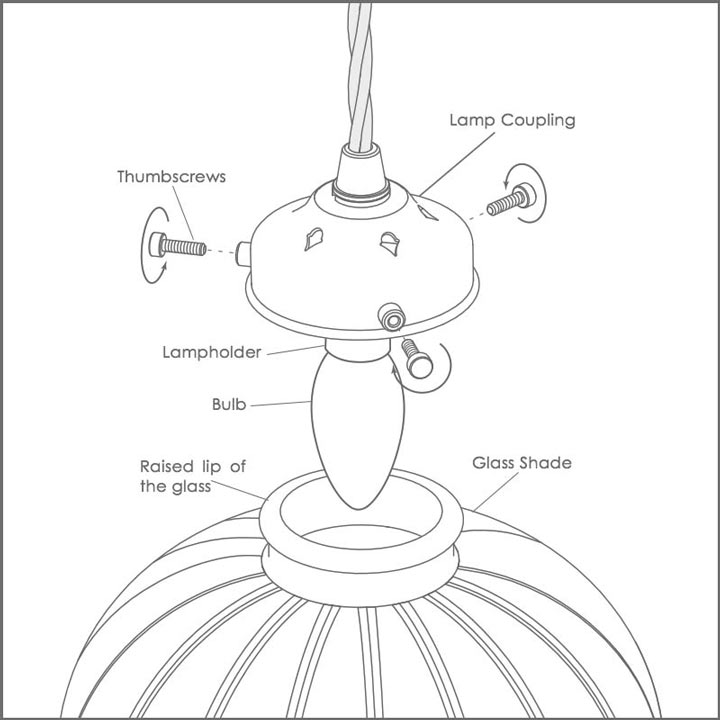
2. Fit a light bulb, then ensure the raised lip of the glass is pushed up above the line of the thumbscrews.
3. Begin to tighten the thumbscrews alternating from screw to screw so that they are all wound in at an even length.
4. Once all screws have made good contact with the glass the raised lip will prevent the glass from falling out. Ensure the screws are finger tight being careful not over tighten as this may damage the glass.
5. If a chain is supplied with this light it MUST be used at all times.
This information is intended as a guide only. Please see the latest IEE Wiring Regulations for full details. Jim Lawrence takes no responsibility for incorrectly installed lights & recommends that all lights should be installed by a qualified electrician.
Our brilliantly simple pattresses
Wiring in period homes can be a tricky business which is why our design team have come up with this brilliantly versatile, neat little pattress to give your ceiling rose or wall light back plate extra depth.
The pattress screws onto your existing Jim Lawrence Georgian ceiling rose to give it extra space to house the external wiring.
We also have a wall fitting version for use with our Club, Holt and Fisher wall lights. Both pattresses come in all corresponding colourways to give you a subtle but practical wiring solution.