DefaultPageTemplate.ascx

YOUR STEP BY STEP GUIDE TO OUR CONDUIT
1. Evaluate the installation area
Start by assessing the route for your conduit installation.
Consider accessibility and choose the shortest, most efficient path between your electrical outlets as this will save on materials, time and give a cleaner more professional look.

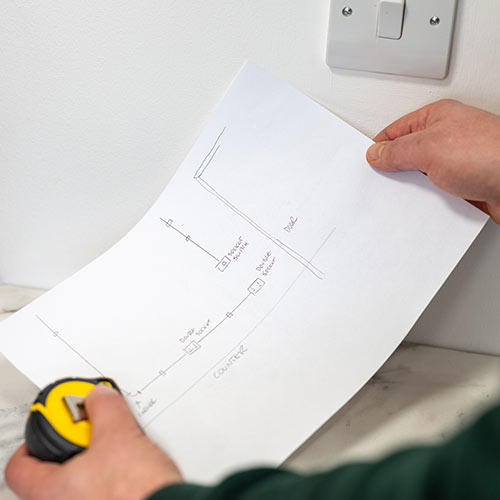
2. sketch your layout
It is not always easy to configure the conduit you need for a project, so we suggest making a rough sketch of the layout you wish to use as this will help you visualise what you require.
Make a note of what parts you need and how many, and add your measurements so you know the lengths of tube you need to make.
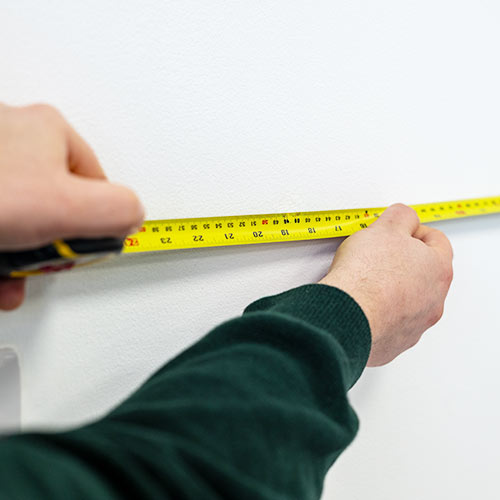
3. Mark & measure the route
Use a marker or pencil to outline on the wall or
ceiling where your conduit will be placed, remembering to include angles and any electrical components you use along the way.
Accurate marking and measurements are essential for easy installation, so take your time and double check your measurements.
If you have a sketch of the layout, add the measurements to it.
4. Choose the lengths you need
We make our 20mm conduit tubes in x 3 handy lengths that are used in most applications – 0.5m, 1m and 2m.
You can use a hacksaw to shorten the tubes on installation if you require. Any unsightly ends will be hidden by the couplers, elbow joints or other components.
5. Think about the components you need
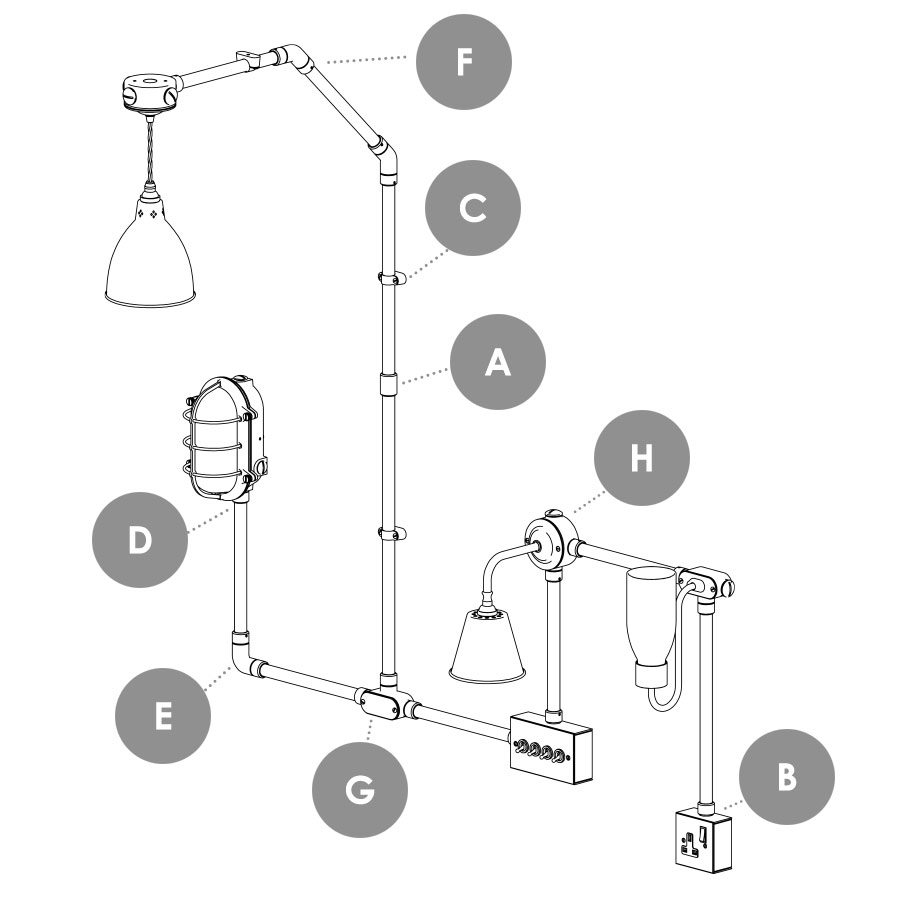
JOINERS AND EXTENDERS
We offer x 4 types of joiners for connecting conduit to other components or for extending tubes and cabling. These push fit couplers have an internal O-Ring that presses against the tube creating an IP seal.

For joining two straight lengths of conduit.

For joining conduit tubes, and joining to elbow joints, junction boxes and our single and double surface mounting boxes.

Required for supporting lengths of conduit tubing over 1m.
6. Consider how to navigate corners
We offer 2 types of elbow joints that can be used with the conduit couplers to route your conduit around a corner.
A 90 degree conduit elbow for a tight corner – remember you will need a conduit adaptor at each end to connect your conduit.
A 45 degree elbow for a shallower bend – use in conjunction with a conduit coupler at each end.
7. DO YOU NEED A JUNCTION BOX?
Junction boxes are designed for the termination and/or connection of multiple electrical cables and/or conduit tubes.
Use them to re-route cables, incorporate switch and socket spurs, or attach our conduit compatible wall and ceiling lights.
T - Junction Box – supplied with one open entry port and 2 blanking caps for any unused ports. Use in conjunction with a conduit coupler or cable gland to attach conduit/cable, and with the coupler adaptor for our outdoor Bulkhead, Harbour and Doncaster wall lights.
4 - Way Junction Box – supplied with a removable lid, integrated earth point and 3 blanking caps for any unused ports. Use in conjunction with conduit couplers (or cable gland/coupler adaptor) depending on application.
8. CONSIDER YOUR ELECTRICAL COMPONENTS
Outdoors - Our Bulkhead, Harbour and Doncaster wall lights work in conjunction with our conduit. Remember, you will need to use a Conduit Couple Adaptor to connect these lights to a conduit tube or junction box.
Indoors - we have a wide range of indoor wall lights and pendants that are compatible with our conduit system if used with the 4 Way Junction Box as a back plate. Simply discard the junction box face plate and screw the wall light or ceiling pendant fitting in its place.
Conduit Ceiling Rose – attaches directly to conduit on a wall or ceiling and can be used in conjunction with a pendant or straight cylinder shade, or one of our ES glass shades if used with our BC to ES Shade Adaptor.
Surface Mounting Boxes – we offer a single and double surface mounting box in our signature antiqued brass finish that can be used in conjunction with our conduit system. They come supplied with 1 x conduit adaptor for attaching conduit and x 2 blanking caps for unused ports.
SHOP CONDUIT COMPATIBLE LIGHTS
SHOP CONDUIT MOUNTING BOXES
9. DO YOU NEED A CABLE GLAND?
Our conduit cable gland is used for the entry of a supply cable, either at the point your electricity supply enters the conduit system, or where you wish to connect a light or junction box.
Our conduit tube gland enables you to feed your supply cable directly into a conduit tube without the need for a junction box.
10. Do you need additional brackets?
We recommend using a saddle bracket at a maximum spacing of 100cm of unsupported tube and or positioning brackets either side of a joint, intersection or corner for additional support.
11. Add everything to your sketch
When you have listed all the parts you require, it’s a good idea to add them to your layout sketch, along with your measurements and remembering to include all the smaller items such as couplers and brackets, to double check you’ve not missed anything out.
Jim Lawrence, The Ironworks
Lady Lane, Hadleigh
Suffolk, IP7 6BQ
Speak to one of the sales team on
01473 826685
Our telephone lines are open:
Monday - Friday: 9:30am - 5pm